This is a sponsored conversation written by me on behalf of Albertsons Safeway and Old El Paso. The opinions and text are all mine.

At my house I love easy weekday meals like this Chilaquiles casserole that I can prepare between helping my kids with their homework after school and doing my own work. I went shopping at Randalls to buy Old El Paso products to help me make this delicious meal for my family.

Thanks to my Randalls Remarkable card, I got great prices on my Old El Paso products.

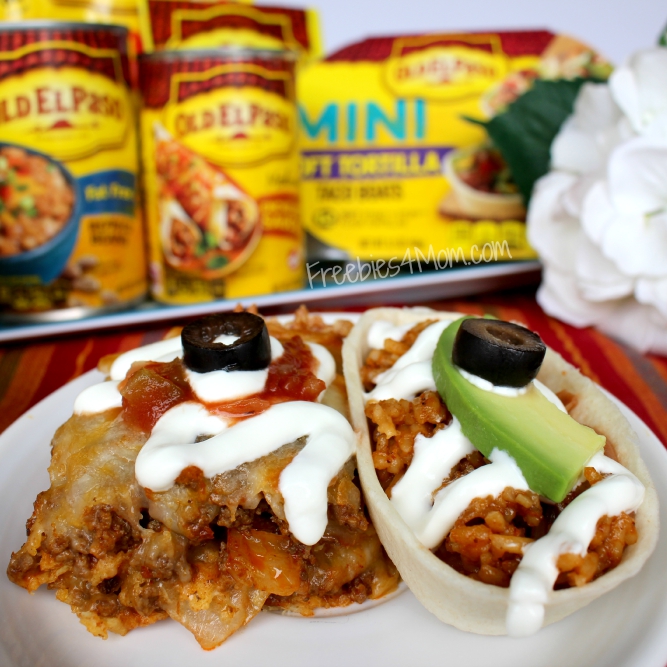
I like to stock my pantry with several Old El Paso products because they are so versatile and always help me answer the ‘What’s for dinner?’ question. My favorite Old El Paso product are the Mini Soft Tortilla Taco Boats because they are adorable and perfectly sized for creating a side dish!

Another favorite Old El Paso product of mine are the Fat Free Refried Beans. They are delicious and we like to add them to the Mini Soft Tortilla Taco Boats and then top with shredded cheese.

Here is my recipe for Easy Chilaquiles casserole. Remember that the garnishes are optional or you can substitute for your family’s favorite taco-friendly toppings.
- 1 lb ground beef
- 1 packet Old El Paso Original Taco Seasoning Mix
- 5 oz. diced yellow or white onions
- 10 ct. package of small yellow corn tortillas (you will only use 5)
- 2 cans Old El Paso Medium Enchliada Sauce (10 oz.)
- 16 oz. shredded Mexican Cheese
- olive oil spray
- garnishes (sour cream, salsa, black olives, etc.)
- Turn oven on to 400 degrees and spray a 9"x9" casserole dish with olive oil
- Brown the ground beef on Medium Heat in a skillet then drain fat from beef and return to the skillet
- Add diced onions to the beef in the skillet and add in Old El Paso Original Taco Seasoning Mix (do not add any water)
- Stir onions, seasoning and beef until well mixed and onions are translucent
- Empty beef mixture into a bowl and set aside
- Using the same skillet, add enough enchilada sauce to cover the bottom and heat until bubbly
- Add one corn tortilla to the bubbly enchilada sauce and use a spatula to flip once to cover both sides with sauce
- Cut tortilla in half using the tip of your spatula then place each half on an outside edge of your casserole dish
- Repeat until you have a layer of tortillas on the bottom of your casserole dish (a half tortilla on each of the 4 sides plus a half tortilla in the middle)
- Add half of the beef mixture on top of the bottom layer of tortillas
- Add half of the shredded cheese on top of the beef mixture
- Repeat another tortilla, beef and cheese layer
- Bake uncovered in your oven for 20 minutes at 400 degrees
- Carefully remove the hot casserole dish from your oven and let cool for at least 5 minutes before serving
- Garnish with your favorite taco toppings!

As a side dish, I made Bean & Rice Boats by adding Old El Paso Fat Free Refried Beans and Mexican Rice to a Mini Soft Tortilla Taco Boat. These were simple to make while my Chilaquiles casserole was baking. Using the microwave, heat three ingredients according to package directions. Heat the beans first (for about 2 minutes) then the rice (for about 1 minute) and lastly the tortillas (for about 30 seconds). I garnished our Bean & Rice Boats with sour cream, avocado slices and sliced black olives. My kids loved them as a way to dress-up our typical side dishes of beans and rice.

This is a sponsored post, please read my Disclosure Policy.
Originally published September 4, 2015.
Subscribe to Freebies 4 Mom and discover more free recipes
![]()